
You run a business. And you just launched a perfect new website with all the bells and whistles. Unfortunately, it is not getting the response that you anticipated.
So, what went wrong?
If you have a good website, excellent graphics and mind blowing content, then your website ought to bring results, especially when you go by the rules of the book.
But, that might not actually happen.
Because people also want speed.
Even if your website gives your visitors everything they need, they will still require speed.
When your pages load faster, people are more likely to click internal links, browse through your site, and look at everything else you have to offer them.
As per the study done by Gomez, slower page response time results in increase in page abandonment.
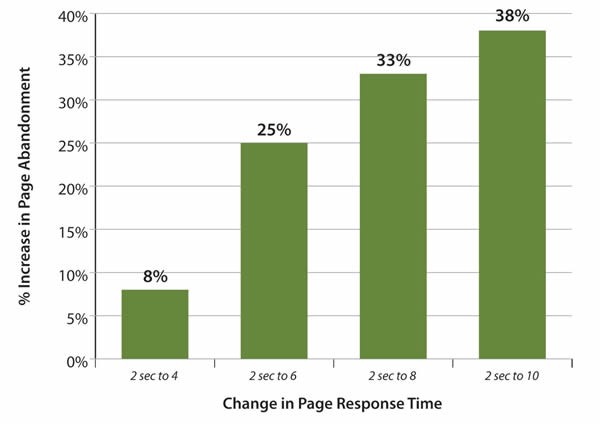
Not only that, website speed is one of the important factors that impact search engine rankings. It is just like having to put in all the effort to make a good dish for dinner, and you forget to put in salt and chillies! Now, that wouldn’t taste good… right?
Do you want a website that loads faster and gets you the results you envisioned?
Then implement some of these tactics and supercharge your website speed.
Large pages having size of around 100KB and more take a longer time to download. Using Gzip compression can cut short the size of your files to as less as 40KB. Compression reduces page response time by about 70%.
This ultimately decreases bandwidth usage and also reduces HTTP response time.
You can enable Gzip compression by adding the following snippet of code to your .htaccess file:
<IfModule mod_deflate.c>

# Compress HTML, CSS, JavaScript, Text, XML and fonts
AddOutputFilterByType DEFLATE application/javascript
AddOutputFilterByType DEFLATE application/rss+xml
AddOutputFilterByType DEFLATE application/vnd.ms-fontobject
AddOutputFilterByType DEFLATE application/x-font
AddOutputFilterByType DEFLATE application/x-font-opentype
AddOutputFilterByType DEFLATE application/x-font-otf
AddOutputFilterByType DEFLATE application/x-font-truetype
AddOutputFilterByType DEFLATE application/x-font-ttf
AddOutputFilterByType DEFLATE application/x-javascript
AddOutputFilterByType DEFLATE application/xhtml+xml
AddOutputFilterByType DEFLATE application/xml
AddOutputFilterByType DEFLATE font/opentype
AddOutputFilterByType DEFLATE font/otf
AddOutputFilterByType DEFLATE font/ttf
AddOutputFilterByType DEFLATE image/svg+xml
AddOutputFilterByType DEFLATE image/x-icon
AddOutputFilterByType DEFLATE text/css
AddOutputFilterByType DEFLATE text/html
AddOutputFilterByType DEFLATE text/javascript
AddOutputFilterByType DEFLATE text/plain
AddOutputFilterByType DEFLATE text/xml

# Remove browser bugs (only needed for really old browsers)
BrowserMatch ^Mozilla/4 gzip-only-text/html
BrowserMatch ^Mozilla/4\.0[678] no-gzip
BrowserMatch \bMSIE !no-gzip !gzip-only-text/html
Header append Vary User-Agent
</IfModule>
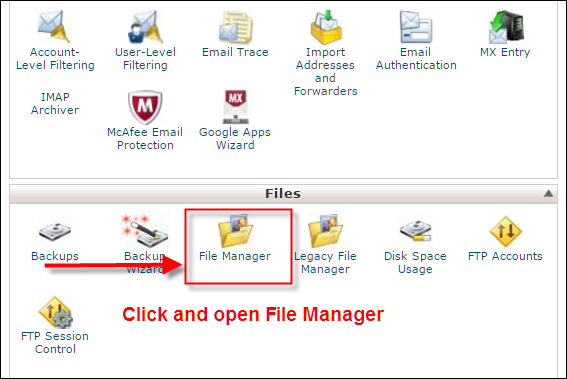
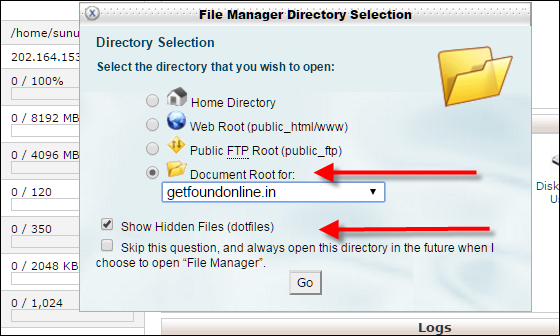
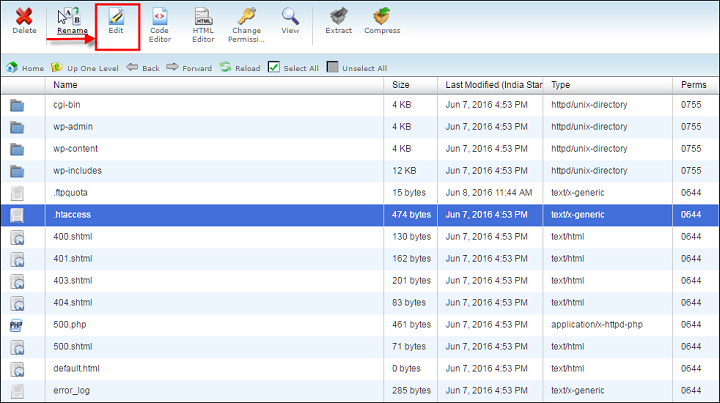
Follow these steps to add the above code to the .htaccess file of your website:
Websites rely on databases to store information and this is usually the method used by e-commerce websites, blogs, news sites and other sites with dynamic functionality. So what you need is a technology that would optimize the database which can search through millions of records and come up with the results you have ordered. This technology is also known as “adding an index”.
By doing this, you can narrow down the search to a few hundreds. This would also help in loading websites faster. On an average people would wait 3 seconds before they scoot, so you have less than 3 seconds to retain your visitors.
phpMyAdmin offers you few optimization options for optimizing your database tables. phpMyAdmin is applicable to those websites that use MySQL database for their functioning. To optimize a database for a WordPress installation, follow these steps:
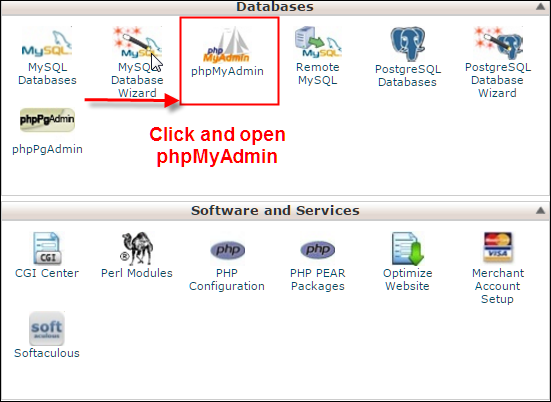
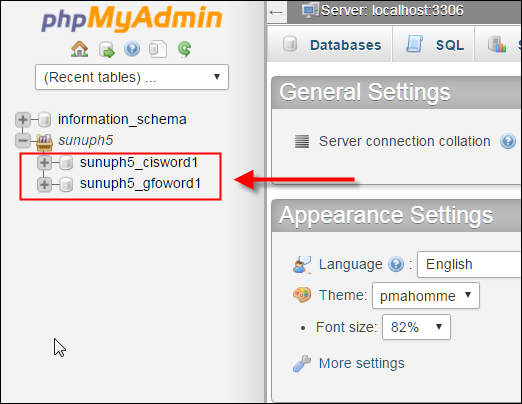
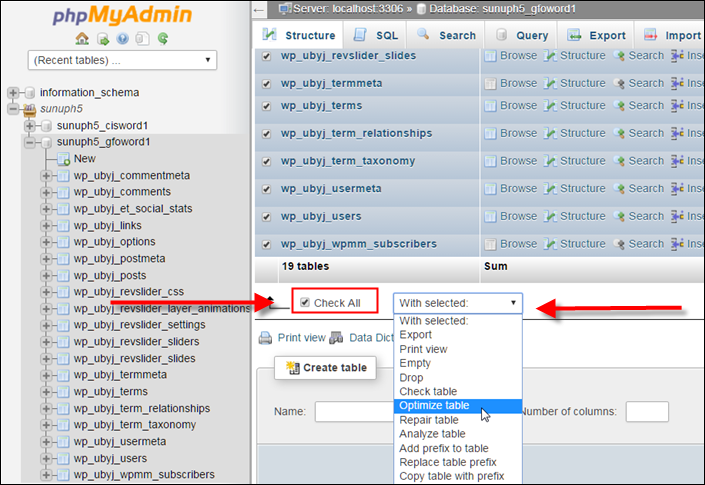
After this, phpMyAdmin will inform you whether the optimization process was successful or not.
Tracking codes are quite important if you want to analyze user behavior. But, it’s important to know the type of scripts used in tracking codes.
There are two ways in which tracking code snippet loads : (a) Synchronous and (b) Asynchronous
Synchronous tracking codes executes each function or statement in a sequential manner. If the synchronous code that you have added to the header section of your webpage fails for some reason, the entire webpage will not be loaded unless the code is executed successfully. This will simply cause a lot of delay.
On the other hand, asynchronous tracking codes run parallel to the webpage code and does not affect the page loading time of your website. The asynchronous code has a timer set for the pages to load. If it fails to load within the set time, the code stops execution and the control version i.e. the original version of the webpage is displayed to the visitor.
Here are three things you can do with tracking codes :
(a) Only use those tracking codes which are absolutely necessary.
(b) Make sure the tracking codes that you have installed are asynchronous in nature.
(c) If its possible, add asynchronous tracking codes at the bottom of the page, just before the closing body tag(</body>). There will be no problem for the page to load and your codes will be loaded last.
It is a good idea to cache or store all the static files (images, CSS and JavaScript) of a webpage in the user’s browser. This is done by enabling browser caching. So, the next time, when the visitor accesses the website, all the static elements will be automatically loaded without having to send multiple HTTP requests.
Browser caching drastically reduces the webpage loading time thereby increasing website speed. For caching, you can set expiry dates for certain type of files and they will be updated at regular time intervals.
For example, you can set an expiry date of one week for a site’s logo. So, only after one week, will the logo be downloaded from the site. Every time you visit the website before the expiry date, the cached logo will automatically appear on the screen.
Browser Caching can be enabled by adding this code to your .htaccess file:
## EXPIRES CACHING ##

ExpiresActive On
ExpiresByType image/jpg "access plus 1 year"
ExpiresByType image/jpeg "access plus 1 year"
ExpiresByType image/gif "access plus 1 year"
ExpiresByType image/png "access plus 1 year"
ExpiresByType text/css "access plus 1 month"
ExpiresByType application/pdf "access plus 1 month"
ExpiresByType text/x-javascript "access plus 1 month"
ExpiresByType application/x-shockwave-flash "access plus 1 month"
ExpiresByType image/x-icon "access plus 1 year"
ExpiresDefault "access plus 2 days"

## EXPIRES CACHING ##
You can follow the same process explained in the first point, to add this code to your .htaccess file.
Images play a crucial role in the success of your website. The more images you add to your webpage, the more credibility and reliability you get for your claims. But you should understand which type of image file to use.
Use JPG as your default image type. It is very light and quicker to load. Check the below example. Jpeg version file size is less than the PNG version.


Use PNG only for sharing texts as JPG makes text images blurry.


Avoid or minimize the use of GIF as it prolongs the loading time. But well, GIF images seem to be all the rage right now! Even Twitter has now integrated GIPHY and Riffsy images to their Tweet editor. If it fits your audience, use them in your blog posts and articles.

Images occupy a considerable amount of the visual space of your webpage. Consequently, it slows down your website. Without compromising on the quality of the image, this problem can be fixed by optimization.
You can optimize images that are more than 50 KB in Photoshop or by using any other image optimizing software. Save images for web with an image quality of about 60-70 % .
For example, an image of size 109 KB can be optimized to 65 KB; 40% smaller. Though an optimized and a non-optimized image looks very much the same, the former is easier to load.


Uploading scaled images reduces the delay in loading websites. Instead of uploading the full size bigger image and letting it re-size to lesser dimensions automatically, you can upload scaled image with the required lesser dimensions.
For example, when you upload images having bigger dimensions like 2000 * 1000 px to blog posts or other CMS, they get automatically scaled to fit in to the allowed post width maybe to around, 700 * 350 px (It can vary according to theme and CMS).
Instead you can scale the image to the required lesser dimension i.e, 700 * 350 px and upload it. This saves 20- 30% file loading time!
You have a blog and you need it to reach your target segment in New York. It won’t be much of a problem if the website’s server is located in New York. But if you want somebody in India to see your page, how do you ensure that the data reaches them quickly after travelling through multiple routers?
All the data, including static content like images, videos, CSS files, JavaScript files will have to be transferred as and when the page is called for. So it would be a great idea to have a content delivery network (CDN) where a copy of your page would be present in India, and of course, it is already available in New York.
CDN is a distributed network of proxy servers deployed in multiple centers across the globe so that anyone can access a website that has its servers in a geographical location that is far away from that of the user’s. It ultimately reduces server lag and static files are rendered quickly.
There are several CDN options available. CloudFlare is a good free option. If you have a budget, you can check out MaxCDN which is quite popular.
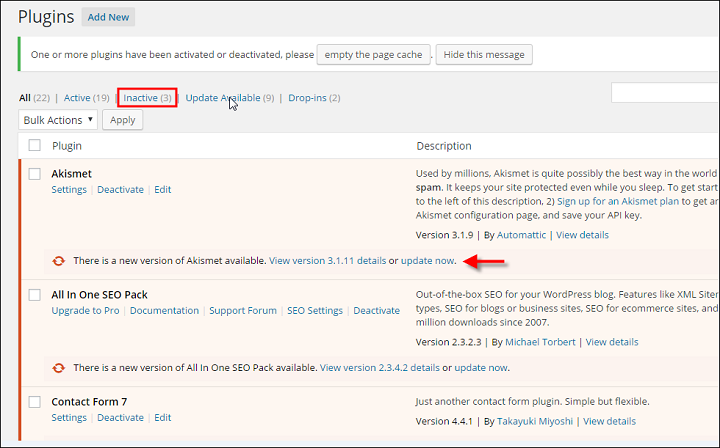
If you can reduce the number of plugins and add-ons installed on your website, that would be a great way to cut down on the load time. Deactivate and delete all unnecessary plugins and add-ons.
Also, inactive plugins simply clutter your dashboard. Delete these inactive plugins and related files from the dashboard or server.
Make sure that you update installed plugins and add-ons periodically.
Downloading static files like images, stylesheets, scripts, etc. form a major chunk of a website’s loading time. An HTTP request is made for each one of these elements, so the more on-page components, the longer it takes for the page to render.
Reducing the HTTP requests cuts the loading time and saves bandwidth. This can be done by merging your script and CSS files. If you choose a CSS compressor, you have access to various levels of compression depending on how compressed you want the CSS files to be.
Images can be combined in data sprites using CSS Image Sprites, but you need some coding knowledge for this.
You can generate CSS Sprites by simply uploading your images to InstantSprite.com or CSSSprites.com. Follow their instructions to get the sprite working on your website.
![]()
Selecting the right type of web host is very important as far as website speed is concerned. You must choose the web host depending on the business that you run and the features you want to make available on the website. Your web host will be responsible for handling varying volumes of inbound traffic and supporting all the features on your website.
For example, if you have a personal website or blog, you can either choose free hosting or shared hosting. I don’t usually recommend a free host, because it limits what your website can do. On the other hand, if you own an E-commerce website with high inbound traffic or a feature-rich website, then you should select Virtual Private Server (VPS) or a Dedicated Server.
Shared hosting is cheaper compared to VPS and Dedicated Servers but it has limited server features. If your site exceeds the CPU usage limit, your website will be shut down, and you might not be able to get it back up unless you upgrade. Dedicated Servers are expensive but they provide high security features besides tech support, database support and e-mail solutions.
The web host you choose should have a good reputation, guaranteed up-time and adequate storage capacity. It must also support the features you require for your website and be capable of handling the expected volume of traffic.
Before you finalize on your web hosting company, Google up and compare the customer reviews about different companies. Check reviews about the server downtime and other related complaints and then make an informed decision.
Every second counts when somebody is loading a website. Users are fidgety and they have a lot of options. Most people are willing to devote only a few seconds of their time before they move on. So don’t lose a customer just because your website is slow in loading. It is not worth taking that risk.
Check your webpage loading time using online tools like GTmetrix, WebPageTest, and Google PageSpeed Insights. If it is lesser than expected, then try out the steps given above to boost the speed. Then wait and watch… your website will get more traffic and you will get more business!
Get ready to take your business to the next level. Lots of free resources, worksheets and eBooks to help you get started.